Showing posts with label how-to. Show all posts

Wednesday, June 29, 2011

Giveaway 101: Hosting Your Own Facebook Giveaway

Having hosted my first Facebook giveaway in late May, I've recently been contacted by a number of others interested in hosting their own giveaway but unsure of where to begin. So I thought I would take some time to share what I learned both as a recent giveaway host and as a giveaway sponsor. That said, I am not an expert nor a lawyer. Instead, I'm sharing what I learned from my personal experiences. And here's what I learned...

First, read and follow Facebook guidelines. Here's a good breakdown of the guidelines and what you can and cannot do:
bloggingbasics101 on livestream.com.


Basics to Keep in Mind:
  • You cannot require participants to "like" a sponsor's page if you are giving away other's items. However, you can "Like-Gate." Like fan-gating, like-gating makes it so that the participant has to "like" the host's Facebook page in order to access the giveaway application or form.

  • Use a third party app to host your giveaway on Facebook. There are a number of them available through developers like Wildfire or ShortStack. But the easiest way I found to do it (and free!) was to create an entry form for each prize using Google Forms. It made it easy to keep track of who entered to win each item and easy to use Random.org to select a winner.

  • You also cannot post winners via Facebook. You need to notify winners through your blog or through email. It is important to think about how you will notify winners prior to posting your giveaway. You likely will need to ask participants to share their email addresses. Using a Google Form, like I suggested above, insures that participants don't have to publicly share their email.

  • Use Bitly to share a link to your giveaway. Bitly not only allows you to shorten your giveaway link, but signing up for a free account also allows you to track who clicked on your link with its built in analytics.

  • PROMOTE! Promote to your current Facebook fans before your giveaway begins. Research giveaway sites and blogs. Use other social media sites - blogs, sweepstakes sites, Twitter, Pinterest (my new favorite) - to share your giveaway information. Some great places to share your giveaway are the Blog Giveaway Directory, Etsy Giveaways (great for Etsy shop owners), and this Squidoo list.
I jumped almost 150 fans in 1 week during my giveaway and had a few more sales than usual in my Etsy shop. Not sure if the sales were a result of the giveaway, but I'm sure it didn't hurt.

Good Luck!

post signature

Wednesday, June 22, 2011

Warm Weather Watercolors

My refrigerator has become a gallery. For the last few days, my toddler has done nothing but paint. He wakes in the morning - "Mommy, can we paint?" After breakfast - "Painting time?" Following nap time, he bounds from his bed - "Paint time!" But rather than grabbing for his finger paints, he runs to the freezer when he wants to paint.

Using inexpensive popsicle molds I found at Ikea, my son and I had fun filling the molds with water and squeezing different colored drops of food coloring into each. After a quick stir to mix the color into the water, we let the paint-pops freeze for a few hours. Cheaper than store bought finger paints, our paint-pops were so much fun on a hot day!

My son used the paint-pops to swirl and mix colors, and then used a wet paint brush to mix the colors. Such a fun and creative way to spend a hot afternoon.

A word of warning, remind your child that these paint-pops are not to eat. Unfortunately, my son loved our very dark blue paint-pop and before I knew it, it was at his lips. He looked like he had spent some time kissing a smurf. And since we used food coloring, it took a bit longer to wash off than your standard washable watercolor paints.

post signature

Saturday, February 26, 2011

Upcycling Baby Food Jars

A few weeks ago I posted that I was looking for ideas for all the glass baby food jars that are piling up on my kitchen counter. Some are being reused to keep the baby food that I'm making, but I seem to have more than anyone needs. And I hate to simply throw them in the recycle bin. They are such a perfect little size. Cute as they are, I really don't need 20 pin cushions or even more votive candle holders.

So when I was fumbling through my spice rack the other morning, I hit upon an idea. My spice rack is a mismatch of jars and bags. We buy our spices two ways - either in bulk or on the fly. This leaves big bags and little plastic spice containers cluttering our spice rack. Why not reuse those baby food jars as spice jars? Their uniform size would make finding our spices easier and de-clutter our kitchen.

By painting the lids of the baby food jars with chalkboard paint, I can easily label what is in each container and later reuse the container for other spices without having to scrape off a label first.

And the jars are perfect for my crafts, too. I can use chalk to label my crafting supplies and then wipe away the label when I need to use the jar for something else.

I'm loving this chalkboard paint! I see many more chalk-inspired upcycled projects in my future!

Monday, February 21, 2011

Learn with Me: Blogging Basics

I've been blogging for a while in my other role as a high school English teacher, but I've always used sparse, pre-designed templates. I'm excited to have stumbled across a couple of really great resources this past week for expanding my blogging know-how and hopefully adding some professional punch to my blogging endeavors.

First, you have to check out the amazing collection of resources posted just last week over at Tip Junkie. Her post "Blog 101: How to Start, Make It Cute, and Succeed Blogging" is fantastic! I'm looking forward to really digging into all the resources and links she has posted. Whether you are using Blogger or Wordpress, she has a wealth of specific links for customizing your blog whatever platform you happen to be using.

And Heidi over at Sew. Craft. Create. started a new series today which will go through a number of questions she's received recently about blog design. So, if you're looking to punch up your blog's impact, be sure to follow along! She'll be going through how to add links into your header, create your own grab buttons, and so much more.

All that said, watch for changes here! You should start to notice some subtle (and not so subtle) changes with my Babee Crafts blog design!

Friday, February 11, 2011

Fabulous Finds Friday: This Week's Cool Finds

So many great tutorials and projects! So little time!
  • I found this great (and FREE!) little pattern for a newborn's knit hat connected to my favorite place to find organic fabrics online - Stitch Simple (they have a great Tuesday sale - free fat quarters - for their newsletter subscribers). They recently ran an experiment to see if pre-washed organic knits were easy to work with, asking five sewing bloggers to test the fabric and offer their findings and patterns online. Tie Dye Diva took up the challenge and posted her pattern for making this newborn top knot hat.

  • All you need is a camera, some lollipops, and a cooperative little one to make these great little Valentine cards. Jen Parker over at The Smile Report posted a great tutorial for creating these memorable cards.

  • I haven't fully committed to the scrapbooking craze yet. Okay, so I have baskets and bins of decorative brads, beads, and buttons. And I've bought two albums, one for each of my sons, but I haven't actually created a page yet. Instead, I use all my supplies to make gift tags and cards. Recently, I stumbled across a number of great digital scrapbooking sites that offer a ton of free doownloads for personal use. Check out Shabby Princess, Digital Freebies, and O Scraps Freebies for lots of great ideas and free downloads.

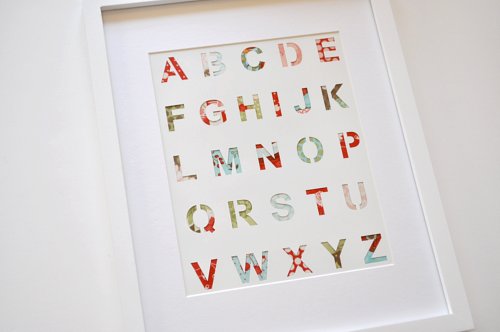
  • Here's a great project for a nursery or toddler's room found on the Design Mom blog. Create very cute (and easy) framed alphabet art using a stencil plate. Actually, walking through the stencil aisle of your local crafts store yields a million variations on this idea. You could easily use a scroll or botanical stencil to create beautiful art for any room in your house.

  • I love this quick and easy Valentine's banner by DIY Dish because it can so easily be adapted to other holidays and celebrations. A great idea! I never thought to distress the edges of a cut-out using dark ink. I guess I haven't been doing enough scrapbooking!

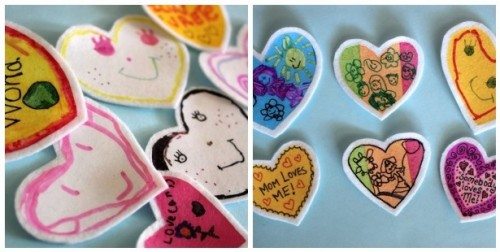
  • And this great little craft to do with the kids can also be easily adapted. Found on Alphamom (I LOVE Alphamom's blog), these homemade Valentine patches are so easy and cute to make with little ones.

  • Heidi Vetter over at Sew, Craft, Create has a very cool tutorial and free printables for creating your own fabric using an inkjet printer. By using your printer, freezer paper, an iron, and fabric, you can design a limitless number of cool embellished project. Heidi includes a very cute Valentine printable for this tutorial.

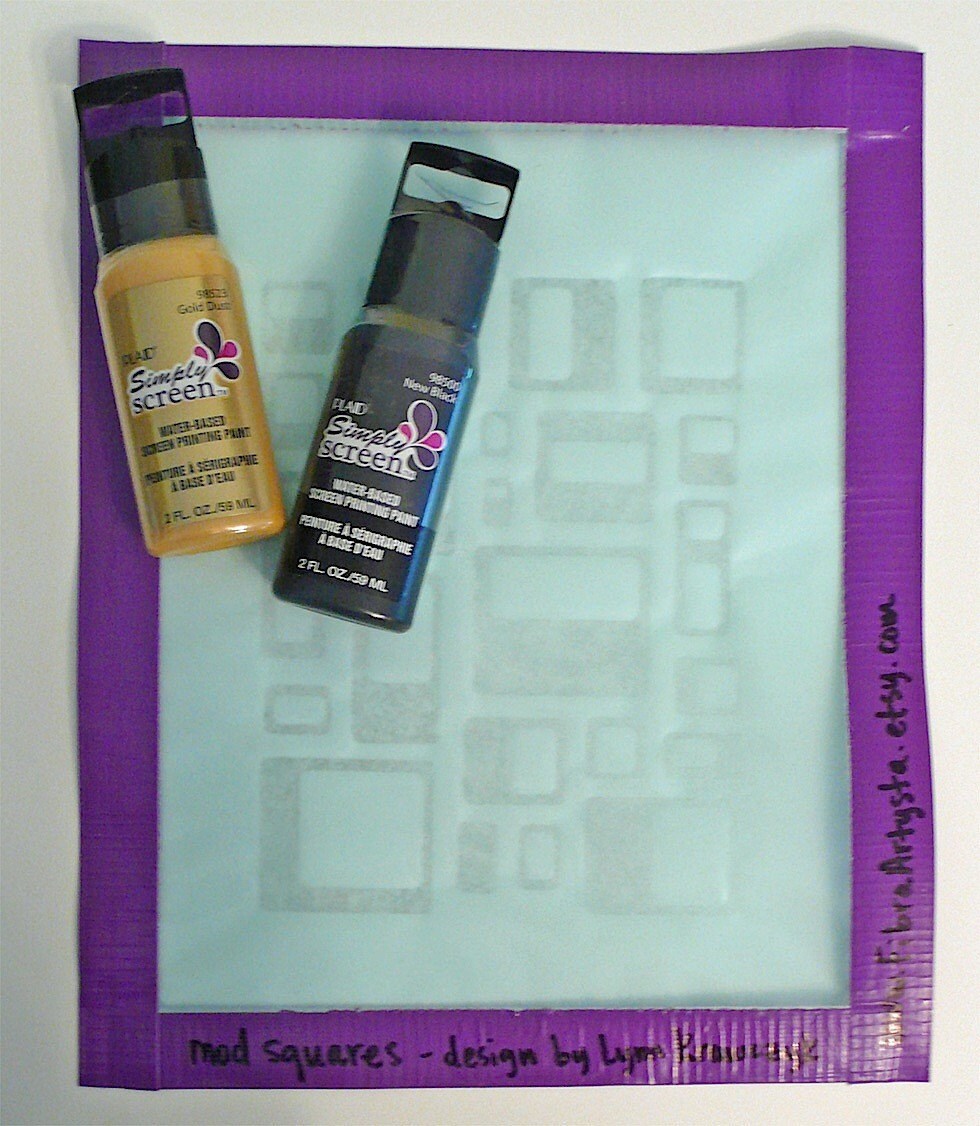
  • I was scouring the JoAnn Fabric website this week to read reviews on personal screen printers. One of the reviewers mentioned Fibra Artysta over on Etsy as a great place to get personalized Thermofax screens without having to hunt down a Thermofax machine. I love this idea! And you have to read her shop announcement. A very well written piece on why she does what she does. Now I just have to decide on what images I'm going to send her first!

Monday, December 13, 2010

Made By Me Monday: Burlap Wreath

I'm on a mission this holiday season. I've banished wrapping paper from our house in an effort to find more environmentally friendly and unique ways of packaging our presents for friends and loved ones. So, as I was putting together a coffee themed gift for a relative, I went in search of a place that sold the burlap bags coffee beans are shipped in, thinking I could use the burlap sack to wrap the gift. Luckily, the Online Fabric Store not only had the bags I was looking for, but they also were incredibly inexpensive and shipped very quickly (I even got a shipping discount). Since they were inexpensive, I bought more than I needed, figuring I would think of a crafty way to use these very cool printed burlap sacks. So, here is my first adventure with coffee bean burlap: a coffee-inspired burlap wreath.

There are a couple of really good reasons to use the coffee bean bag rather than simply buying a yard or two of burlap fabric. First, it's environmentally friendly. You are finding a creative way to upcycle burlap rather than purchase burlap that's never been used. And second, you can't go to a fabric store and find the cool prints that these coffee bags have on them. Depending upon how you wrap your wreath, you can really incorporate some of the great colors and texts that you'll find on the coffee sacks. You'll notice that in the pictures of the smaller wreath that I created, I didn't incorporate much of the printed text on the burlap into my design. But on my second larger wreath, I wrapped the strips of burlap so that the text and graphics showed a bit more. Since many of the graphics were in red and green, I think I'll be decorating this larger wreath to fit in with my Christmas decor. But I'm getting ahead of myself. Let me show you how to create this great, upcycled coffee bean burlap wreath.

SUPPLIES NEEDED:
  • 1 burlap coffee bean bag
  • straw wreath of any size
  • hot glue gun
  • scissors
  • ribbon of your choosing, though wired ribbon is easier to shape
  • decorative button
  • any other decorative elements you might want to incorporate on your wreath
DIRECTIONS:
  1. Begin by cutting your burlap into strips about 2-inches wide. Keep in mind, this will be a messy process. You will have threads and burlap dust everywhere. But since you're creating a rustic-looking wreath, you don't really want neat edges. There's no need to measure before cutting since the fabric will unravel in places.

  2. Plug in the hot glue gun; it's time to burn some fingers. Be warned, a little hot glue goes a long way. Since the burlap is an open weave, be careful of burning your fingers. You'll use your hot glue gun as you wrap the strips of burlap around your straw wreath. Start by hot gluing one end of a strip to your wreath on a slight diagonal. You'll use your glue gun each time you come to the end of a strip and need to add a new one. Keep in mind that you ideally want your strips to end on the backside of the wreath, so you may need to cut off some of the length of your strips to ensure that you'll be gluing on the back of your wreath. Before gluing a strip into place, wrap it to make sure the design looks as you want it to. Do you want more or less of the coffee bean graphic and text showing?

  3. Now that your wreath base is put together, you can begin to decorate. I wrapped this small wreath with ribbon following the diagonal of the burlap wrap. I also left ribbon on the back of the wreath so that I could create a loop to hang the wreath.

  4. There are a number of great tutorials on the web for creating decorative flowers, some of which I've listed below. I wanted to create a flower using the coffee bean burlap, but since I knew the fabric would likely ravel, I couldn't use a pattern that called for clean edges. So I created my own flower. I began with four 3x3 inch squares of fabric, and four 2x2 inch squares of fabric. I first folded each square into a triangle. Then, holding the folded edge, I took the outside tips of the triangle and folded them toward the top tip. I used doubled up quilting thread and used a few stitches to hold the folded triangles together, but you could also use hot glue. You'll repeat this for each of the squares of fabric, which should leave you with four large petals and four small ones
  5. To assemble the flower, you can either stitch or hot glue the large petals together at the center. If you stitch, as I did, double up your thread and cut an extra long piece. I used only one length of thread to assemble this flower, often leaving the needle sticking up through the center and stacking my parts onto the needle.

  6. After securing the four bottom petals together, you'll use ribbon to create the next layer. I simply looped in my ribbon so that it would peak through the open spaces between the large petals, folding it much like you would an awareness ribbon, with the printed side of the ribbon always facing up.


  7. Then repeat with the smaller petals. Once you have your layers together, secure them by stitching a button at the center of the flower. Then all you need to do is hot glue your flower to your wreath and you're done!


OTHER IDEAS:
You'll find this tutorial linked at:
MakingThe Girl Creative Keeping It Simple

Friday, December 10, 2010

Fabulous Finds Friday: This Week's Cool Finds

Thought I would share some of the great tutorials I found myself reading and bookmarking this week. Many of them have been inspiration for the gifts I'll be giving this holiday season. Enjoy!

  • Stephanie over at Full of Great Ideas has a wonderful tutorial on making hand-print snowman ornaments with your kids. This easy-to-do project will make a great addition to our Christmas tree this year.

  • I want to be Heather Bailey. You need to check out her blog, tutorials, and free patterns. They are amazing! I especially liked the idea of using her pinwheel tutorial as a way to create decorations for the top of your holiday packages.

  • This wine cork wreath tutorial was sent out via an Etsy tweet not long ago. I've been collecting our wine corks for years in hopes of putting something like this together. I'm looking forward to using this tutorial to help me do so.

  • While I'm being Heather Bailey, I want hang out with the women over at Green Eyed Monsters, a fabulous collection of environmentally responsible crafters and bloggers. Check out this well-written tutorial for creating a wreath out of your old sweaters.

  • I love Becca's tutorial over Blue Cricket Designs for easy-to-make bird inspired artwork. I've just recently discovered how fun and easy it is to decoupage, so I'll certainly be using this idea soon.

  • And speaking of art, this is a great tutorial for creating holiday inspired art over at Alphamom. I especially love the Rudolph inspired mirror design.

Monday, December 6, 2010

Made By Me Monday: Easy Earring Display


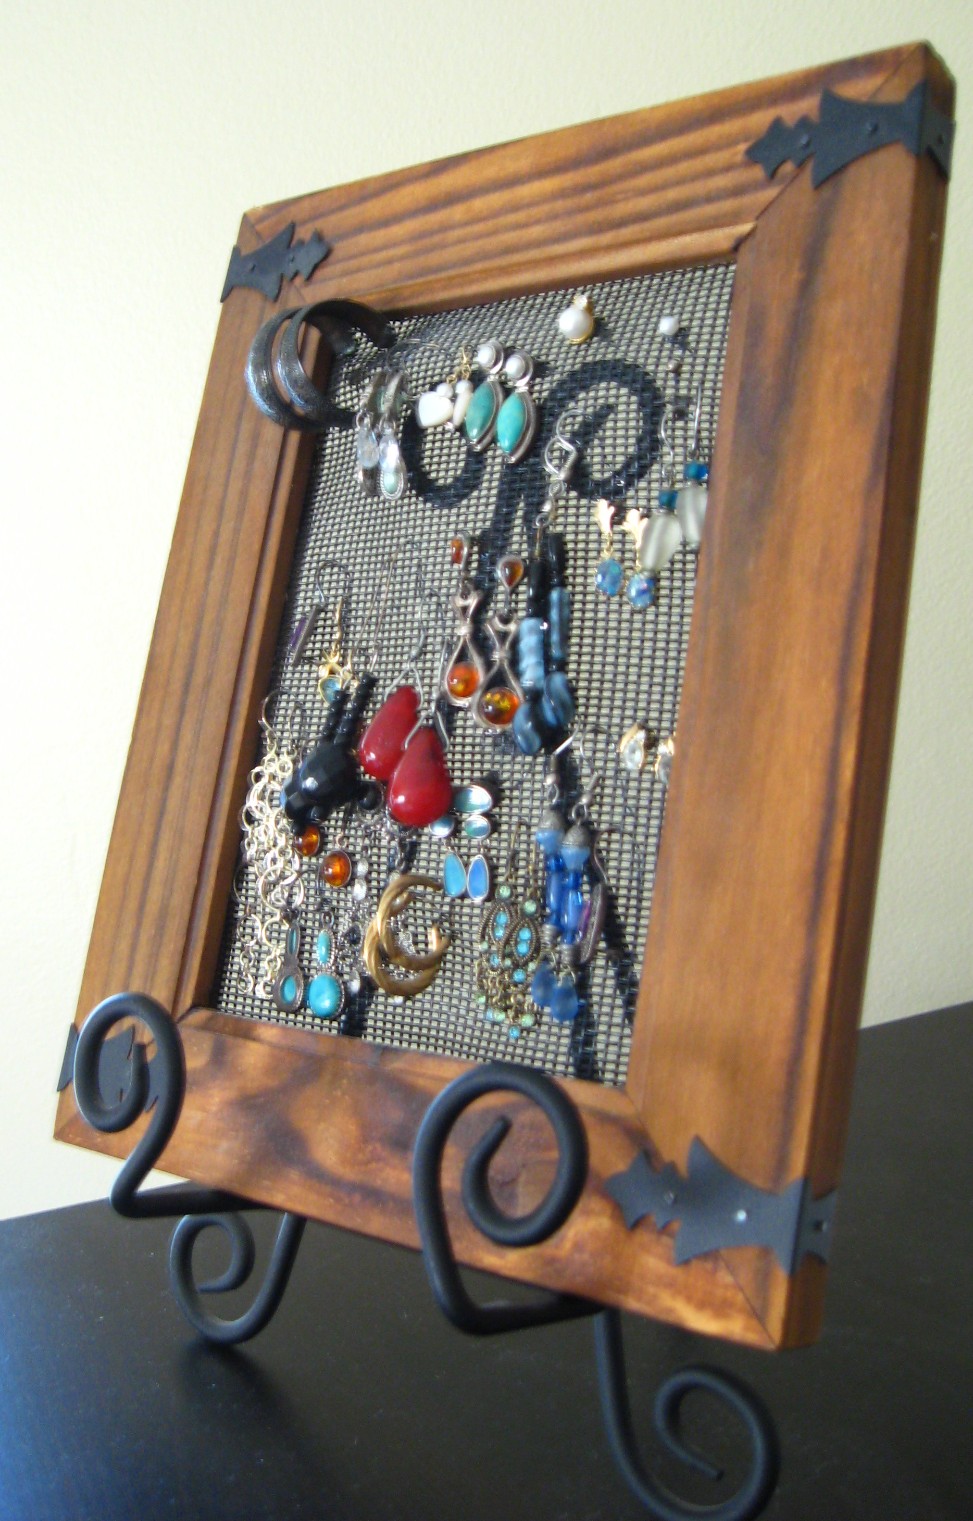
Looking for a unique gift for a jewelry lover? Instead of simply purchasing a pair of earrings and wrapping them up in a generic gift box, why not give two gifts in one? This easy to make earring display stand makes a nice gift by itself or as a lovely display on which to hang a gift of homemade earrings (and here's a great earring tutorial).


SUPPLIES:
Before beginning, you will need to make a trip to your local arts and crafts store (don't forget your 40% off coupon), and then a trip to your local hardware store. You will need:
  • a good pair of crafting scissors or a safety cutter
  • a wooden picture frame, a 5x7 frame works well
  • a picture frame or plate stand
  • glue gun and glue
  • a roll of pet screening (large weave, plastic instead of wire)
  • decorative drawer pulls (optional)

DIRECTIONS:
  1. Begin by carefully removing the entire back from the frame. You'll also remove the glass, but don't discard it. You'll need to use the glass as your template for your screen material.

  2. Lay the glass from the frame on the pet screen material. Use masking tape to mark off the area you will need to cut, and use your scissors or safety cutter to cut out a section of screen that will fit where the glass used to sit. Your screen will need to be slightly larger than the opening of the frame as you will need to secure it to the back side of the frame.

  3. Next use your hot glue gun to secure the screen mesh to the back inside of the frame.

  4. The optional drawer pulls can be screwed into the front of the frame to be used as a place to hang necklaces and bracelets. However, you only want to add these pulls to a sturdy frame that you feel comfortable drilling into.

  5. Use the picture stand or plate stand to prop the earring display up. And there you have it! You're own easy-to-make earring display.

You'll also find this tutorial linked at:
The Best Part Of Believetopsy turvy tuesdays
Related Posts Plugin for WordPress, Blogger...